
Recipe Description
To make this Valentine’s day memorable, bake that special someone an elegant yet delicious cake.
This recipe is best with

Recipe Ingredient
- Genoise Sponge
- 4 whole eggs
- 1 tsp vanilla extract
- 100g sugar
- 100g soft flour (sifted)
- 15g cocoa powder (sifted)
- 80g melted butter
- Chocolate Shaving and Fresh Cream Filling
- 500g whipping cream
- 80g icing sugar
- 1 tsp vanilla extract
- 250g dark chocolate (Couverture)
- Cherry Filling
- 3 tsp corn flour
- 425g canned pitted dark cherries (drained, reserving 100g of the syrup)
- Kirsch Syrup (Optional) or Syrup form the Dark Pitted Cherries
- 60g sugar OR 100g of dark pitted cherries Syrup
- 40g Kirsch
Instructions
- Preheat oven to 175 degrees Celcius and lightly grease the bottom of a 9in round cake pan.
- Using a hand mixer, whisk eggs, vanilla and sugar over a double boiler with simmering water constantly until the mixture is smooth & reaches 'ribbon stage', about 8-10 minutes. (To determine if you have achieved the 'ribbon stage', the mixture has to be stiffen and thickened as you pull the batter up with the beater and it stays atop the rest of the mixture for about 10 seconds or more, forming a ribbon-like effect. It should be tripled in volume.
- Fold 1/4 of the egg mixture into the melted butter to lighten the butter. Fold the mixture back into the rest of the egg mixture. Sift 1/3 of the combined flour and cocoa powder into the egg mixture, and then gently but quickly fold together. Repeat this steps until the flour has been incorporated. (Take precaution on the folding method as how you fold the mixture together is crucial to determine the success of a light and spongy génoise. You want to evenly incorporate the flour into the egg mixture without deflating the aerated eggs. It's important that you are quick and gentle at the same time, cutting the spatula down toward the center, lifting the batter from the bottom of the bowl, and turning the bowl with your other hand towards the hand that is folding)
- Gently pour the batter into the cake pan and bake about 25-30 minutes or until the cake is golden brown and starts to shrink from the sides of the pan.
- Slice the cake into 3 horizontal layers and cut individually with a round cutter. (Shall be able to get around 4 to 5 minis round forest cake)
- Using a vegetable peeler, pare off small curls from the chocolate. In a large bowl, whisk the cream, icing sugar and vanilla until the cream forms soft peaks. Reserve one quarter of the cream for decoration.
- To make the cherry filling, mix the corn flour with a little syrup from the cherries to form a runny paste. Put the remaining syrup in a small pan and bring to boil.
- Remove from the heat, stir in the corn flour paste, return to the heat and stir until boiling. Remove from the heat; add 3/4 of the dark cherries, reserving around 15 nice ones for decoration, and leave to cool.
- To make the kirsch syrup, gently warm the sugar with 60g of Dark Pitted Cherries Syrup in a small pan, stir to dissolve the sugar. Increase the heat, bring to the boil and immediately remove from the heat. Add the kirsch and allow to cool.
- To assemble the cake, brush the kirsch syrup over each layer sponge. Place the top layer of sponge onto a plate or cake board, with the crust-side down and pipe some cream onto it. Cover with the middle sponge. Spread a thin layer of cream on top, leaving a thicker border of cream around edge. Spread the cherry filling within the border and cover the last piece of sponge. Spread the top and sides of the cakes thinly with cream and chill for 30minutes. Repeat covering with the cream until an even coat is achieved.
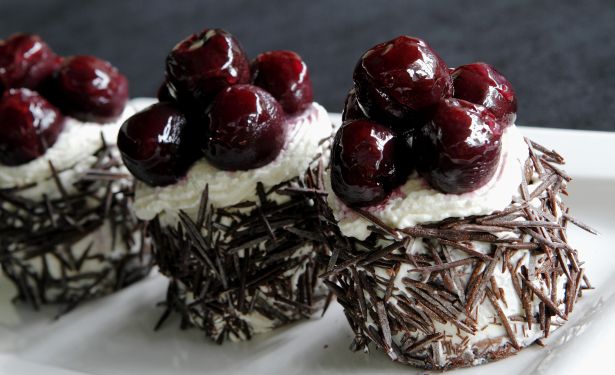
- Press the chocolate curls / shavings around the sides and piped rosettes with the reserved cream on top. Decorate with the reserved cherries as shown on the photos.
- Now, the Petit Black Forest Gateau is ready to be served.
Genoise Sponge:
Chocolate Shaving and Fresh Cream Filling:
Cherry Filling:
Kirsch Syrup or Syrup from the Dark Pitted Cherries: